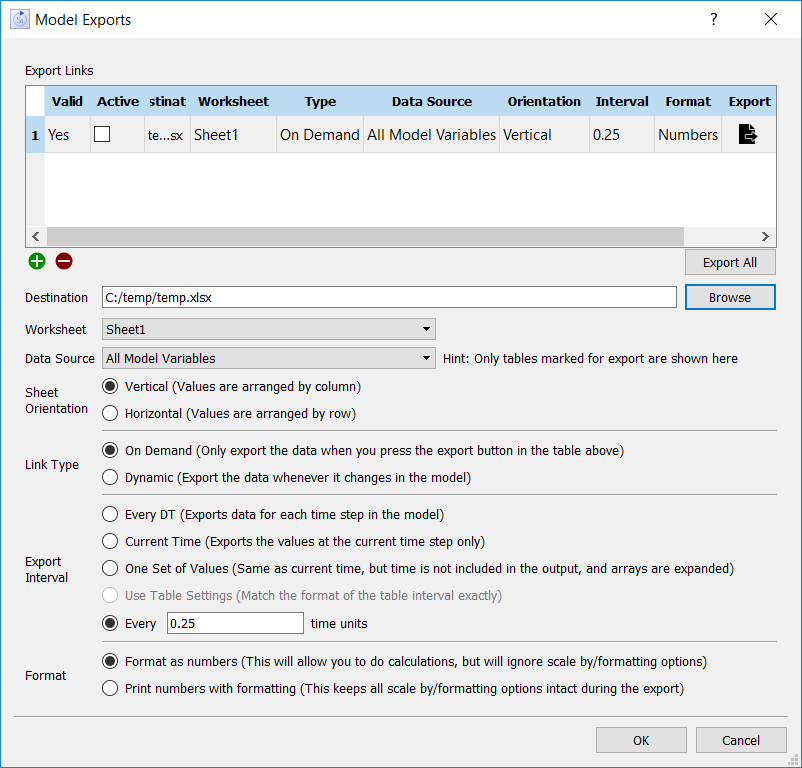
Use the Export Data dialog box to select the options you want to use when exporting model data to a linked Excel file. For more information, see Setting Up Export Links.
To open the Export Data dialog box, choose Export Data from the Model menu.
Each link is shown in a separate row. Use the ![]() button to add a new link. Then, use the controls described below to set it up. To remove a link, click on the link you want to remove, and then click on the
button to add a new link. Then, use the controls described below to set it up. To remove a link, click on the link you want to remove, and then click on the ![]() button.
button.
To edit a link click on it, and then edit it in the field below the list. If you change to a different row, any changes you made to the row you are working on will be incorporated into that list.
Note Most of the columns have corresponding controls, where changes are actually made, as described below. The exceptions are Valid, which is display only, the Active checkbox and the Export ![]() button which only appear in the list.
button which only appear in the list.
Valid
This column indicates whether the destination you've specified exists and can be read. It will say No until you select a destination, and will also say No if you have an existing link, but the file is missing or unreadable.
Active
Check this option to have the specified used, or uncheck it to effectively turn the link off. When unchecked the link will be ignored when the model is run and when you click on the Export All button described below. You can still perform an export for the link with the Export
button appearing at the right.
Destination
This specifies the file to which the software will write the data. Click on this field to open a File Selection dialog and choose a file. If the file can't be used, most commonly because all its worksheets are already specified for importing or exporting data, an error message will appear.
Note: The file should be located in the same directory as the model, or a subdirectory of the model directory, named data. If you use a file from a different location, copying the model to a different computer will likely make the link invalid.
Worksheet
This option is only applicable to Excel files, and the control will not be visible if you choose a csv file. After you've selected the file, the first worksheet it contains and that is not in use will be shown. Click on dropdown list
then, click on the name of the worksheet to select the worksheet you want.
Note: You can only choose worksheets not already in use by other import or export links. If there's a single worksheet available, it will be the only one listed in the dropdown, if no worksheets are available you will get a message saying so when you try to choose the file.
Type/Link Type
- Dynamic, if selected, will export data as the model is simulated (only at the end or during a pause for csv destinations).
- On Demand, if selected, will do nothing during a simulation. Click on the Export
Data Source
Select the data source from the dropdown. The choices are:
- All Model Variables to export everything in the model. This option is only available if you have asked to save all model variables in Model Settings Properties Panel.
- All Variables in Graphs and Tables to export everything reported on in the model. This option is available when you have not asked to save all model variables in Model Settings Properties Panel.
- Parameter Values to export all constants and the y values of graphicals. The resulting file or sheet can then be imported to repeat settings from the current run.
- Table Names will list any tables that you've marked for export (see Table Properties) using the names you've specified. Select a table to export its contents.
Orientation/Sheeta Orientation
This specifies the orientation of the destination data. This option isn't available for tables; tables use the orientation of the table.
- Vertical, if selected, will put variable names along the first row with the associated values directly underneath them (one row for each time point).
- Horizontal, if selected, will put variable names along the first column with the associated values directly to their right (one column for each time point).
Interval
This specifies the frequency with which you want to export the data. Choose among the following:
- Every DT will export values every DT, which is to say, everything.
- Current Time will export values for the current time only. Instead of a series of numbers, you'll get a single number for every variable. Time (labeled by the units you've set for it) will be included in the output.
- One Set of Values will export values for the current time only, and any arrays will be exported in full rows. If you choose this option for a table, the variables appearing in the table will all have all elements exported. Time will not be included in the output.
- Use Table Settings will export the content as it appears in the table. This is only applicable when you've chosen a table.
- Every __ time units will export according to the interval you specify. Type in a value after clicking on the checkbox.
Format
Select the format you want values to appear in the exported document.
- Format as numbers will put the values out in a way that can be read by other programs. It will use . or , for a decimal delimiter based on location, as many digits as possible, and scientific notation for very large or small numbers.
- Printer numbers with formatting will put out values as they appear in tables. If you exporting a table the content will exactly match that in the software. For everything else the scales and ranges panel will be used. The resulting text will not always be interpretable as numbers by other software.
Export
Click on the
Click this button to export to all of the links that are marked enabled. Links marked both dynamic and on demand will be exported. A message will be displayed showing the results of all the exports. If you have many links, this is a convenient way to check that they're all working as expected.
Note: "Export all" exports from the most recently made run. If you haven't made a run, names will be exported, but no values will be.
Click OK to save the changes you've made to links. Click Cancel to discard them. Note that any changes you have made in the editing portion of the dialog will be incorporated into the row you are editing. If you did export any results the files created by that will still exist whether you choose OK or Cancel.